My friends Bryan and Lyn moved to San Diego and they asked if I could help take some shots for the listing for their house. I thought it would be a fun thing to try and I jumped at the chance. As I don’t as often take shots of homes and interiors, I did a little reading up on the subject over the few days before the shoot. Among other pages I looked through, I found that Photo Centric has a pretty comprehensive set of pages on photographing interiors.
I won’t go over all the tips they mention, but among those that stick out in my mind, they recommend using a tripod (no surprise, there) and they also stress the importance of keeping one’s camera level, especially when taking shots with a wide-angle lens. Keeping one’s camera level left-to-right is probably old hat, but they point out that keeping one’s camera level front-to-back particularly helps lessen wide-angle distortion. (This is one of those times where a hot-shoe bubble level can come in handy.)
Given the challenges of lighting an empty house—and that I didn’t want to take up their Realtor’s whole afternoon with intricate strobe setups—I turned to HDR for my shots. As I don’t often shoot HDR, I figured I should brush up on some of the details, so I picked up my well-worn copy of Scott Kelby’s “Adobe Photoshop CS5 Book for Digital Photographers” to jog my memory. (The book is mostly about processing photos with Photoshop CS5—and it’s excellent for that—but it also has a couple chapters on topics like HDR workflow.)
If you’re just getting into HDR, there’re a couple things to keep in mind on the picture-taking side. Among them, you need to shoot in RAW mode and you also need to set your camera to use exposure bracketing with a span of at least 2 stops on either side of your normal-exposure shot (that is to say, a shot 2 stops underexposed, a normal exposure, and a shot 2 stops overexposed). It’s OK if you’re able to exceed 2 stops on either end—such as a sequence of -4, -2, 0, +2, +4 if you happen to have 5-shot bracketing—but the important part is that it’s at least 2 stops.
Canon DSLRs allow for a 2-stop bracketing interval, so you can get by with just 3-shot bracketing. On the other hand—and for reasons that aren’t quite clear to me—many modern Nikon DSLRs allow for at most a 1-stop bracketing interval. Fortunately, many of those same Nikon DSLRs offer up to 9-shot bracketing sequences, so even if your shots are 1 stop apart, you can still go for a sequence such as -2, -1, 0, +1, +2 and you’ll have the range that you need.
Another trick that Scott mentions in his book is that if you enable both bracketing and high-speed continuous shooting, you can capture a full HDR sequence with a single shutter press. (On my Canon 40D, I have to hold down the shutter—click, click, click—before I let go, but other camera models might allow you to tap and let go of the shutter and have it take the entire sequence.)
It’s rather handy to be able to hold down the shutter and have the camera sweep through your bracketing sequence, but even so, one’s overexposed end of the bracketing sequence may end up with exposures as long as 3–4 seconds. You may feel that’s the least of your concerns if you’re using a tripod anyway, but sometimes even the action of depressing the shutter can introduce a tiny amount of blur when you’re dealing with exposures that long.
To help counteract that potential for camera shake, one easy solution is to use a remote shutter release. It doesn’t necessarily have to be one of those fancy wireless shutter releases—although those are fine too— but even a simple wired shutter release with a 2–3' cord is perfectly fine. The main thing is just having a shutter that’s physically separate from your camera body.

There’s a perception that HDR shots necessarily have that overprocessed “HDR look”, but that doesn’t have to be the case. If one practices restraint and resists the temptation to turn all the knobs to eleven, one can end up with shots that make use of HDR without being a garish mess. As well, although one can use fancy 3rd-party software for processing HDR shots, Photoshop from version CS5 forward is actually pretty decent, so if you already have that, you’re all set—and that’s what I used for these shots. (HDR processing in Photoshop CS4 and earlier, on the other hand, is fairly rubbish and if that’s the version you happen to have, you’re probably better off with 3rd-party software such as Photomatix.)
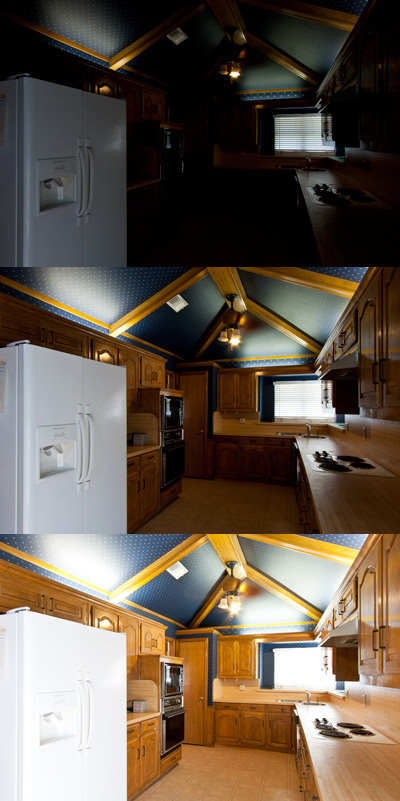
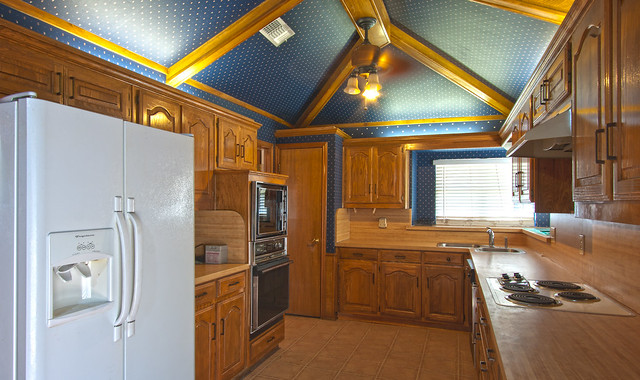
If you had wanted to see how one of my exposures came together, I’ve included the pre-HDR-processing bracketing sequence I used for the shot of Bryan and Lyn’s kitchen. At first glance, the 2-stops-overexposed shot (the bottom shot among the three) may look similar to the final HDR shot (which you can also see at the top of this post), but if you take a closer look, you can see that both the fridge and the window ended up blown-out in that shot. As well, if you look at the kitchen ceiling in each of the three shots, you can see how no single exposure was able to capture the ceiling without either overexposing or underexposing swaths of it. Fortunately, that’s an area in which HDR can help and in the final shot I was able to get a more even exposure across the ceiling.
If you know what to look for, you may see a few signs of HDR in a couple shots, but I was really just looking for lifelike exposures without turning the shots into photographic versions of Toontown. After processing the shots, I passed them along to Bryan and Lyn’s Realtor and he added them to their listing. I’m really happy to have be able to help out my friends a bit and I’m pleased with how they turned out.
